> Note: This page is part of the DataDoe Docs. You can find the root of the documentation at `https://www.datadoe.com/hub/docs/basics/introduction-to-datadoe`.
> JSON Table of Contents: `https://www.datadoe.com/hub/docs/toc.json`.
> Direct Data Scheme JSON: `https://api.datadoe.com/api/v1/spec/data-scheme`.
> Other pages in the DataDoe Docs:
> - DataDoe Basics/Access & Users: `https://www.datadoe.com/hub/docs/basics/access-user-management.md`
> - DataDoe Basics/Benefits: `https://www.datadoe.com/hub/docs/basics/benefits.md`
> - DataDoe Basics/External Invitation Links: `https://www.datadoe.com/hub/docs/basics/external-invitation-links.md`
> - DataDoe Basics/Integrations: `https://www.datadoe.com/hub/docs/basics/integration-customization.md`
> - DataDoe Basics/Introduction to DataDoe: `https://www.datadoe.com/hub/docs/basics/introduction-to-datadoe.md`
> - DataDoe Basics/Subscription and pricing: `https://www.datadoe.com/hub/docs/basics/subscription-pricing.md`
> - DataDoe Data/Data Fetch Periods: `https://www.datadoe.com/hub/docs/datadoe-data/data-fetch-periods.md`
> - DataDoe Data/Data Sources: `https://www.datadoe.com/hub/docs/datadoe-data/data-sources.md`
> - DataDoe Data/Managing Data Tables: `https://www.datadoe.com/hub/docs/datadoe-data/managing-data-tables.md`
> - DataDoe Data/Timezones: `https://www.datadoe.com/hub/docs/datadoe-data/orders-purchase-date-timezones.md`
> - DataDoe Features/Actions (beta): `https://www.datadoe.com/hub/docs/datadoe-features/actions.md`
> - DataDoe Features/Features Overview: `https://www.datadoe.com/hub/docs/datadoe-features/overview.md`
> - DataDoe MCP/Overview: `https://www.datadoe.com/hub/docs/datadoe-mcp/overview.md`
> - DataDoe MCP/Using ChatGPT: `https://www.datadoe.com/hub/docs/datadoe-mcp/chatgpt.md`
> - DataDoe MCP/Using Claude: `https://www.datadoe.com/hub/docs/datadoe-mcp/claude.md`
> - DataDoe MCP/Using Claude Agent SDK: `https://www.datadoe.com/hub/docs/datadoe-mcp/claude-agents-sdk.md`
> - DataDoe MCP/Using Claude Code: `https://www.datadoe.com/hub/docs/datadoe-mcp/claude-code.md`
> - DataDoe MCP/Using Codex: `https://www.datadoe.com/hub/docs/datadoe-mcp/codex.md`
> - DataDoe MCP/Using Codex Sites: `https://www.datadoe.com/hub/docs/datadoe-mcp/codex-sites.md`
> - DataDoe MCP/Using CrewAI: `https://www.datadoe.com/hub/docs/datadoe-mcp/crewai.md`
> - DataDoe MCP/Using Cursor: `https://www.datadoe.com/hub/docs/datadoe-mcp/cursor.md`
> - DataDoe MCP/Using Excel + Claude: `https://www.datadoe.com/hub/docs/datadoe-mcp/excel.md`
> - DataDoe MCP/Using Gemini CLI: `https://www.datadoe.com/hub/docs/datadoe-mcp/gemini-cli.md`
> - DataDoe MCP/Using Gumloop: `https://www.datadoe.com/hub/docs/datadoe-mcp/gumloop.md`
> - DataDoe MCP/Using Hermes Agent: `https://www.datadoe.com/hub/docs/datadoe-mcp/hermes.md`
> - DataDoe MCP/Using n8n: `https://www.datadoe.com/hub/docs/datadoe-mcp/n8n.md`
> - DataDoe MCP/Using NanoClaw: `https://www.datadoe.com/hub/docs/datadoe-mcp/nanoclaw.md`
> - DataDoe MCP/Using OpenAI Agents SDK: `https://www.datadoe.com/hub/docs/datadoe-mcp/openai-agents-sdk.md`
> - DataDoe MCP/Using OpenClaw: `https://www.datadoe.com/hub/docs/datadoe-mcp/openclaw.md`
> - DataDoe MCP/Using PowerPoint + Claude: `https://www.datadoe.com/hub/docs/datadoe-mcp/powerpoint.md`
> - DataDoe MCP/Using VS Code: `https://www.datadoe.com/hub/docs/datadoe-mcp/vs-code.md`
> - DataDoe MCP/Using Word + Claude: `https://www.datadoe.com/hub/docs/datadoe-mcp/word.md`
> - DataDoe API/Build with Codex: `https://www.datadoe.com/hub/docs/datadoe-api/codex.md`
> - DataDoe API/How to connect to the API: `https://www.datadoe.com/hub/docs/datadoe-api/how-to-connect.md`
> - DataDoe API/Vibe code with Claude Code: `https://www.datadoe.com/hub/docs/datadoe-api/claude-code.md`
> - DataDoe API/Vibe code with Cursor: `https://www.datadoe.com/hub/docs/datadoe-api/cursor.md`
> - DataDoe API/Vibe code with Lovable: `https://www.datadoe.com/hub/docs/datadoe-api/lovable.md`
> - DataDoe API/Vibe code with Replit: `https://www.datadoe.com/hub/docs/datadoe-api/replit.md`
> - DataDoe API/Vibe code with v0: `https://www.datadoe.com/hub/docs/datadoe-api/v0.md`
> - DataDoe & BigQuery/How to connect to BigQuery: `https://www.datadoe.com/hub/docs/datadoe-bigquery/how-to-connect.md`
> - DataDoe & BigQuery/Using MCP Toolbox: `https://www.datadoe.com/hub/docs/datadoe-bigquery/mcp-toolbox.md`
> - DataDoe & BigQuery/Using Python Jupyter: `https://www.datadoe.com/hub/docs/datadoe-bigquery/jupyter.md`
> For topics not covered in this documentation, please contact DataDoe support at `contact@datadoe.com`.
> Do not assume anything. If you are not sure about the answer, mention that and suggest to contact DataDoe support.

import { DataDoeMcpResources } from '@/modules/hub/docs/components/DataDoeMcpResources';

# Using OpenCode with DataDoe MCP

[OpenCode](https://opencode.ai) is an open-source AI coding agent built for the terminal. It supports a TUI, CLI, and desktop app, and works with major LLM providers such as Anthropic, OpenAI, and Google. Unlike browser-based assistants, OpenCode runs in your terminal alongside your code, making it a natural fit for scaffolding projects, writing scripts, and building tools that use live data.

In this setup, DataDoe MCP acts as the **data layer** for OpenCode. Your agent calls DataDoe tools to read live Amazon Seller, Vendor, and Ads data on demand, without manual exports or custom SP-API pipelines.

## What you will build

By the end of this tutorial, you will have:

- OpenCode installed and running on your machine
- An LLM provider configured (Anthropic, OpenAI, or OpenCode Zen)
- DataDoe MCP connected via the `~/.config/opencode/opencode.jsonc` config file
- A verified first query listing your connected Amazon sellers
- A seven-day sales report generated directly in the terminal
- A self-contained `dashboard.html` sales dashboard built by OpenCode using live DataDoe data, ready to open in any browser

![OpenCode TUI with DataDoe sales dashboard output](/hub-files/mcp/opencode/overview-1.png)
![OpenCode TUI with DataDoe sales dashboard output](/hub-files/mcp/opencode/overview-2.png)

## Prerequisites

- A DataDoe account with your Amazon connections set up and synced
- A DataDoe MCP key — if you have not created one yet, follow the [DataDoe MCP Overview](/hub/docs/datadoe-mcp/overview) guide first, then return here. You can also create a key directly in [DataDoe MCP Integrations](https://app.datadoe.com/integrations/mcp)
- An API key for your chosen LLM provider (Anthropic or OpenAI), **or** use the built-in OpenCode Zen tier (no external key required)
- A modern terminal emulator, such as [WezTerm](https://wezfurlong.org/wezterm/), [Ghostty](https://ghostty.org), [Alacritty](https://alacritty.org), or [Kitty](https://sw.kovidgoyal.net/kitty/)
- [Node.js](https://nodejs.org) 18 or later installed (verify with `node --version`)

## Step 1: Install OpenCode

Install OpenCode using the method that suits your platform:

```bash
# One-liner (recommended)
curl -fsSL https://opencode.ai/install | bash

# Node.js (npm, bun, pnpm, or yarn)
npm i -g opencode-ai@latest

# macOS and Linux (Homebrew — always up to date)
brew install anomalyco/tap/opencode

# Windows
scoop install opencode
choco install opencode
```

A **desktop app** is also available if you prefer a graphical interface. Download it from [opencode.ai/download](https://opencode.ai/download) for macOS, Windows, or Linux.

Verify the installation:

```bash
opencode --version
```

![OpenCode TUI launch screen](/hub-files/mcp/opencode/step-1-install.png)

## Step 2: Configure an LLM provider and choose a model

Navigate to any directory and run `opencode` to open the TUI. You have two options for connecting an LLM:

**Option A — OpenCode Zen (no external API key required)**

Run `/connect` inside the TUI, select **opencode**, and sign in at [opencode.ai/auth](https://opencode.ai/auth). Zen provides a curated set of models maintained by the OpenCode team, so you do not need an Anthropic or OpenAI account.

**Option B — your own API key**

Run `/model` inside the TUI to open the model picker:

1. Select a provider — OpenCode supports **Anthropic, OpenAI, Google, Mistral**, and more
2. Choose an authentication method: **API key**
3. Paste your key
4. Select a model, for example `claude-sonnet-4-6`

![OpenCode /model provider list](/hub-files/mcp/opencode/step-2-provider-select.png)

![OpenCode model selection](/hub-files/mcp/opencode/step-2-model-select.png)

> **Build vs. plan mode.** OpenCode has two built-in agent modes: **build** (default, full file access) and **plan** (read-only, for analysis and exploration). Switch between them with the `Tab` key. For this tutorial, stay in **build** mode.

## Step 3: Connect DataDoe MCP

> **Important:** OpenCode does not currently support adding remote authenticated MCP servers with a CLI command. You must configure DataDoe MCP by editing the config file manually in a text editor such as VS Code, nano, or vim.

Open `~/.config/opencode/opencode.jsonc` in your preferred text editor and add the following block:

```jsonc
{
    "$schema": "https://opencode.ai/config.json",
    "mcp": {
        "datadoe-mcp": {
            "type": "remote",
            "url": "https://mcp.datadoe.com/mcp/v1",
            "enabled": true,
            "headers": {
                "datadoe-mcp-key": "YOUR_DATADOE_MCP_KEY"
            }
        }
    }
}
```

Replace `YOUR_DATADOE_MCP_KEY` with your key from [DataDoe MCP Integrations](https://app.datadoe.com/integrations/mcp).

Save the file. Before restarting OpenCode, you can verify that the config is picked up correctly by running the following command in your terminal:

```bash
opencode mcp list
```

This lists all configured MCP servers and their status. You should see `datadoe-mcp` with a `connected` or `enabled` state.

![opencode mcp list output showing datadoe-mcp connected](/hub-files/mcp/opencode/step-3-mcp-list.png)

If `datadoe-mcp` does not appear, check that the config file is saved at `~/.config/opencode/opencode.jsonc` and that it contains valid JSON with no trailing commas and correct indentation.

Now **restart OpenCode** (press <kbd>cmd + c</kbd> to quit, then run `opencode` again) to load the MCP server into the active session.

### Quick setup reference

If you are already familiar with OpenCode MCP configuration, here is everything you need:

```
Config:   ~/.config/opencode/opencode.jsonc  →  mcp.datadoe-mcp
URL:      https://mcp.datadoe.com/mcp/v1
Header:   datadoe-mcp-key: YOUR_DATADOE_MCP_KEY
```

## Step 4: Verify the MCP connection

Restart OpenCode and open a new session, then ask:

```
What DataDoe tools do you have access to?
```

OpenCode should respond with a list of DataDoe MCP tools, such as `list_sellers`, `query_table`, and others. If no tools appear, check that the config file contains valid JSON with correct indentation and that the MCP key is correct.

![OpenCode TUI — DataDoe tools list](/hub-files/mcp/opencode/step-4-tools-list.png)

## Step 5: First conversation and seven-day sales report

### List your connected sellers

Start with a simple query to confirm that DataDoe data flows through the connection:

```
List my all available sellers on Amazon
```

OpenCode calls `list_sellers` through DataDoe MCP and returns the names of your connected accounts. Note the seller name, as you will use it in the next query.

![OpenCode TUI — list sellers result](/hub-files/mcp/opencode/step-5-list-sellers.png)

### Generate a seven-day sales report

Now use OpenCode to produce a business report. Paste the prompt below, replacing `{example_seller}` with your seller name:

```
Prepare me a sales summary for {example_seller} seller for last 7 days
```

OpenCode will:

1. Call `list_sellers` to confirm the account
2. Query the `Profit by SKU & Date` table for the last seven days
3. Analyse the data and return a structured markdown report with per-SKU breakdowns, daily rows, and executive KPIs (total sales, units sold, profit, ACoS, TACoS, ROI)

![OpenCode TUI — 7-day sales report result](/hub-files/mcp/opencode/step-6-sales-report.png)

## Step 6: Build a sales dashboard HTML page

This step shows OpenCode's full coding agent capability: it fetches live Amazon data from DataDoe and writes a complete, self-contained HTML dashboard into your project folder. No server or build step is required.

### Setup

Create a new project directory and open OpenCode inside it:

```bash
mkdir sales-dashboard && cd sales-dashboard
opencode
```

### Prompt

Paste the following prompt, replacing `{example_seller}` with your seller name:

```
Using DataDoe MCP, fetch the 7-day sales data for my {example_seller} seller and create
a self-contained HTML file called dashboard.html with a sales dashboard. Include:
- KPI cards at the top: total revenue, total units sold, total profit, average ACoS
- A daily revenue chart (bar chart) using Chart.js from CDN
- A table of top 5 products by profit with columns: SKU, ASIN, total revenue, units sold, profit, ROI
Use clean modern inline CSS, no external stylesheets. All data must come from DataDoe tools.
```

### What OpenCode does

1. Calls `list_sellers` and `query_table` on `Profit by SKU & Date` to fetch the seven-day data
2. Aggregates daily revenue and per-SKU totals
3. Scaffolds `dashboard.html` with Chart.js (loaded from CDN), KPI summary cards, a daily bar chart, and a top-5 product table
4. Writes the file to the current directory

```html
<!DOCTYPE html>
<html lang="en">
    <head>
        <meta charset="UTF-8" />
        <meta name="viewport" content="width=device-width, initial-scale=1.0" />
        <title>Delto UK - 7-Day Sales Dashboard</title>
        <script src="https://cdn.jsdelivr.net/npm/chart.js@4.4.7/dist/chart.umd.min.js"></script>
        <style>
            * {
                margin: 0;
                padding: 0;
                box-sizing: border-box;
                font-family: -apple-system, BlinkMacSystemFont, 'Segoe UI', Roboto, sans-serif;
            }
            body {
                background: #f0f2f5;
                padding: 30px;
                color: #1a1a2e;
            }
            .dashboard {
                max-width: 1200px;
                margin: 0 auto;
            }
            h1 {
                font-size: 26px;
                margin-bottom: 6px;
            }
            .subtitle {
                color: #666;
                font-size: 14px;
                margin-bottom: 24px;
            }
            .kpi-grid {
                display: grid;
                grid-template-columns: repeat(4, 1fr);
                gap: 16px;
                margin-bottom: 24px;
            }
            .kpi-card {
                background: #fff;
                border-radius: 12px;
                padding: 20px;
                box-shadow: 0 1px 4px rgba(0, 0, 0, 0.08);
            }
            .kpi-label {
                font-size: 12px;
                text-transform: uppercase;
                letter-spacing: 0.5px;
                color: #888;
                margin-bottom: 6px;
            }
            .kpi-value {
                font-size: 28px;
                font-weight: 700;
            }
            .kpi-value.green {
                color: #16a34a;
            }
            .kpi-value.blue {
                color: #2563eb;
            }
            .kpi-value.purple {
                color: #7c3aed;
            }
            .kpi-value.orange {
                color: #ea580c;
            }
            .chart-section {
                background: #fff;
                border-radius: 12px;
                padding: 24px;
                box-shadow: 0 1px 4px rgba(0, 0, 0, 0.08);
                margin-bottom: 24px;
            }
            .chart-section h2 {
                font-size: 16px;
                margin-bottom: 16px;
            }
            .chart-wrap {
                position: relative;
                height: 320px;
            }
            .table-section {
                background: #fff;
                border-radius: 12px;
                padding: 24px;
                box-shadow: 0 1px 4px rgba(0, 0, 0, 0.08);
            }
            .table-section h2 {
                font-size: 16px;
                margin-bottom: 16px;
            }
            table {
                width: 100%;
                border-collapse: collapse;
            }
            th {
                text-align: left;
                padding: 10px 12px;
                font-size: 12px;
                text-transform: uppercase;
                letter-spacing: 0.4px;
                color: #888;
                border-bottom: 2px solid #e5e7eb;
            }
            td {
                padding: 10px 12px;
                font-size: 14px;
                border-bottom: 1px solid #f0f0f0;
            }
            tr:last-child td {
                border-bottom: none;
            }
            tr:hover td {
                background: #f9fafb;
            }
            .text-right {
                text-align: right;
            }
            .text-green {
                color: #16a34a;
            }
        </style>
    </head>
    <body>
        <div class="dashboard">
            <h1>
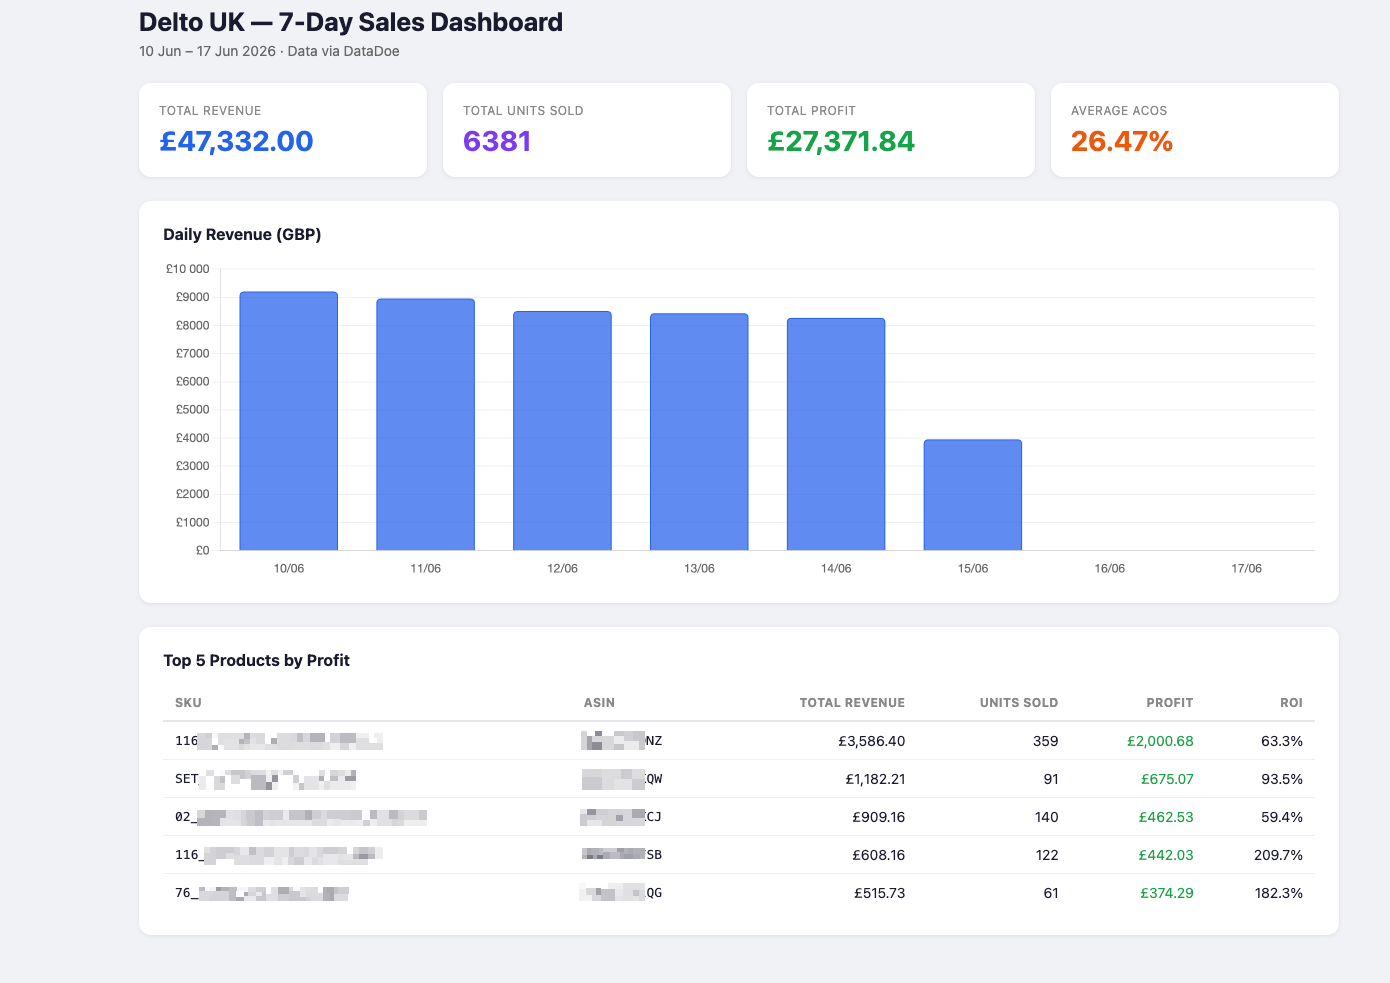
Delto UK — 7-Day Sales Dashboard</h1>
            <p class="subtitle">10 Jun – 17 Jun 2026 &middot; Data via DataDoe</p>

            <div id="kpis" class="kpi-grid"></div>

            <div class="chart-section">
                <h2>Daily Revenue (GBP)</h2>
                <div class="chart-wrap"><canvas id="revenueChart"></canvas></div>
            </div>

            <div class="table-section">
                <h2>Top 5 Products by Profit</h2>
                <table>
                    <thead>
                        <tr>
                            <th>SKU</th>
                            <th>ASIN</th>
                            <th class="text-right">Total Revenue</th>
                            <th class="text-right">Units Sold</th>
                            <th class="text-right">Profit</th>
                            <th class="text-right">ROI</th>
                        </tr>
                    </thead>
                    <tbody id="topProducts"></tbody>
                </table>
            </div>
        </div>

        <script>
            const dailyData = [
                { date: '2026-06-10', sales: 9206.11, units: 1281, profit: 5612.52, acos: 21.21 },
                { date: '2026-06-11', sales: 8956.88, units: 1217, profit: 5451.63, acos: 23.17 },
                { date: '2026-06-12', sales: 8512.72, units: 1124, profit: 5053.9, acos: 23.34 },
                { date: '2026-06-13', sales: 8432.64, units: 1114, profit: 5037.35, acos: 22.25 },
                { date: '2026-06-14', sales: 8272.24, units: 1102, profit: 5062.28, acos: 22.86 },
                { date: '2026-06-15', sales: 3951.41, units: 543, profit: 1914.89, acos: 23.27 },
                { date: '2026-06-16', sales: 0, units: 0, profit: -739.6, acos: 24.9 },
                { date: '2026-06-17', sales: 0, units: 0, profit: -21.13, acos: 50.79 }
            ];

            const topProducts = [
                {
                    sku: '286_5214_UK_bkqnk_ctf_FBA',
                    asin: 'B0UIBG392T',
                    sales: 3586.4,
                    units: 359,
                    profit: 2000.68,
                    roi: 63.29
                },
                {
                    sku: '43_1_3017_m_ball_FBA',
                    asin: 'B033B4S05B',
                    sales: 1182.21,
                    units: 91,
                    profit: 675.07,
                    roi: 93.52
                },
                {
                    sku: 'SET_9_TQVRWGQB_ctf_FBA',
                    asin: 'B0B2JO7LH3',
                    sales: 909.16,
                    units: 140,
                    profit: 462.53,
                    roi: 59.43
                },
                {
                    sku: '30_9749_aluminum_block_FBA_SnL',
                    asin: 'B0HX5GGN1M',
                    sales: 608.16,
                    units: 122,
                    profit: 442.03,
                    roi: 209.66
                },
                {
                    sku: '249_7421_UK_shpmo_ctf_FBA',
                    asin: 'B0CGQVMC6U',
                    sales: 515.73,
                    units: 61,
                    profit: 374.29,
                    roi: 182.29
                }
            ];

            const totalRevenue = dailyData.reduce((s, d) => s + d.sales, 0);
            const totalUnits = dailyData.reduce((s, d) => s + d.units, 0);
            const totalProfit = dailyData.reduce((s, d) => s + d.profit, 0);
            const avgAcos = dailyData.reduce((s, d) => s + d.acos, 0) / dailyData.length;

            const fmt = (n, d = 2) => '£' + n.toFixed(d).replace(/\B(?=(\d{3})+(?!\d))/g, ',');
            const fmtUnits = n => n.toLocaleString();

            document.getElementById('kpis').innerHTML = `
  <div class="kpi-card"><div class="kpi-label">Total Revenue</div><div class="kpi-value blue">${fmt(totalRevenue, 2)}</div></div>
  <div class="kpi-card"><div class="kpi-label">Total Units Sold</div><div class="kpi-value purple">${fmtUnits(totalUnits)}</div></div>
  <div class="kpi-card"><div class="kpi-label">Total Profit</div><div class="kpi-value green">${fmt(totalProfit, 2)}</div></div>
  <div class="kpi-card"><div class="kpi-label">Average ACoS</div><div class="kpi-value orange">${avgAcos.toFixed(2)}%</div></div>
`;

            const labels = dailyData.map(d => {
                const p = d.date.split('-');
                return p[2] + '/' + p[1];
            });
            const values = dailyData.map(d => d.sales);

            new Chart(document.getElementById('revenueChart'), {
                type: 'bar',
                data: {
                    labels,
                    datasets: [
                        {
                            label: 'Revenue (GBP)',
                            data: values,
                            backgroundColor: values.map(v =>
                                v > 0 ? 'rgba(37,99,235,.75)' : 'rgba(200,200,200,.4)'
                            ),
                            borderColor: values.map(v => (v > 0 ? '#2563eb' : '#ccc')),
                            borderWidth: 1,
                            borderRadius: 4
                        }
                    ]
                },
                options: {
                    responsive: true,
                    maintainAspectRatio: false,
                    plugins: {
                        legend: { display: false }
                    },
                    scales: {
                        y: {
                            beginAtZero: true,
                            ticks: { callback: v => '£' + v.toLocaleString() },
                            grid: { color: 'rgba(0,0,0,.06)' }
                        },
                        x: {
                            grid: { display: false }
                        }
                    }
                }
            });

            document.getElementById('topProducts').innerHTML = topProducts
                .map(
                    p => `
  <tr>
    <td style="font-family:monospace;font-size:13px">${p.sku}</td>
    <td style="font-family:monospace;font-size:13px">${p.asin}</td>
    <td class="text-right">${fmt(p.sales, 2)}</td>
    <td class="text-right">${fmtUnits(p.units)}</td>
    <td class="text-right text-green">${fmt(p.profit, 2)}</td>
    <td class="text-right">${p.roi.toFixed(1)}%</td>
  </tr>
`
                )
                .join('');
        </script>
    </body>
</html>
```

### Verify the result

Open the generated file in your browser:

```bash
# macOS
open dashboard.html

# Windows
start dashboard.html

# Linux
xdg-open dashboard.html
```

The page is fully self-contained, so no web server or additional dependencies are required.

![dashboard.html opened in browser](/hub-files/mcp/opencode/step-6-dashboard-browser.png)

> **Note:** The dashboard is generated from live data at the time of running. Re-run the same prompt at any time to refresh the data.

---

## Related resources

- [OpenCode documentation](https://opencode.ai/docs/en)
- [OpenCode MCP server configuration](https://opencode.ai/docs/pl/mcp-servers/)
- [OpenCode GitHub repository](https://github.com/anomalyco/opencode)
- [DataDoe MCP Overview](/hub/docs/datadoe-mcp/overview)
- [DataDoe MCP Integrations](https://app.datadoe.com/integrations/mcp)

## DataDoe MCP resources

Check the following resources for more information:

- MCP server URL: `https://mcp.datadoe.com/mcp/v1`
- [Interactive Data Scheme](/hub/data-scheme)
- Data Scheme JSON: https://api.datadoe.com/api/v1/spec/data-scheme
- Need help? Use the [contact form](https://forms.clickup.com/9015200219/f/8cnj2ev-38615/AOYF9I35QFOXWJQXIG?type=Form&source=hub-mcp-opencode-docs)
